Banana Pudding for all my friends!

The tastiest banana pudding also happens to be the easiest to make!

The tastiest banana pudding also happens to be the easiest to make!

I’ve been on this banana pudding kick lately, which has greatly benefitted my friends and neighbors and their kids. Even though Regina and my own kids love the stuff, we simply couldn’t eat our way through the three huge batches I’ve made recently. We needed help and so Julie and Tim and Zach and Sarah have gotten containers in the past week; I believe they shared them with their kids but it’s possible they didn’t. This banana pudding has a way of making your forget your vows, disregard your children’s welfare, and consider committing higher crimes. Zach refers to the pudding as his “afternoon delight” which conjures up images better left unimagined.

The recipe for this banana pudding is old-fashioned and simple to make. You don’t start from scratch, you start from mixes, like lots of the great American comfort foods of the past fifty years. Canned milk and pudding mix and boxed cookies. Super-easy and super-yummy!

If you’ve ever been to Magnolia Bakery either in NYC or LA you might notice that their banana pudding tastes remarkably similar to this. Well, it should. It’s their recipe and I happily cribbed it. Because it is superb!

You will need:

  • 1 can (14 oz) sweetened condensed milk
  • 1 box (3.4 oz) Jello brand instant vanilla pudding
  • 1.5 cups cold water
  • 3 cups heavy cream
  • 4 cups sliced ripe bananas
  • 1 12-ounce box of Nilla wafers (use the Nabisco kind)

Now do this:

In a stand-up mixer whip together the condensed milk, pudding mix, and water for about two minutes at medium speed. You could use an electric hand mixer if you don’t have a stand-up Kitchen-Aid mixer, of course. Make sure after you’ve whipped it that you don’t see any yellow specks, which would be undissolved pudding powder; beat it a bit more if you need to. Pour pudding into a big mixing bowl and chill until completely set, maybe three hours.

When the pudding is set whip the heavy cream to stiff peaks. Fold the whipped cream gently but completely into the pudding mix. It should be well-combined and not streaky.

Into a big deep bowl put about a third of the cookies in a layer. Top with a third of the bananas and a third of the creamy pudding mix. Make three layers. Chill for at least four hours so the Nilla wafers can soften nicely.

I like to make it the day before. It improves with a full overnight chill-out. It will last three or four days refrigerated although I have no doubt you and your fam will polish it off before that!

IMG_1152

I like this cute pink pudding goblet. Thanks for the loaner Julie Semple!

Roast Beast Sandwich

20130805-134927.jpg

Leftovers make a lovely lunch.

I could make a hundred excuses of why I haven’t been posting to OMNIVOROUS lately and nearly half of those would be true, but the real truth is that I’ve been busy, busy, busy. What with two kids and a hectic work schedule (and an incurable addiction to Instagram) I’ve hardly had time to write a word. But recently I’ve been urged by a number of people to take up the quill again and resume my blogging. Apparently a few of you kind readers had missed my musings. Thank you for the encouragement; I’ll try to get back on the horse and ride it.*

Today’s brief post is about using leftovers to good effect. The night before I made this killer sandwich I’d cooked a large prime shell roast. If you’re not familiar with the term a shell roast is basically a huge New York strip steak roasted in the oven. This one was eight pounds, the equivalent of about ten big thick delicious New Yorks stuck together. I’d seasoned it simply and rubbed it with olive oil. I roasted it at 325ºF for about an hour. I pulled it out when I got a temp reading of 120ºF on my instant-read thermometer. This is considered rare but I knew it would continue cooking outside the oven for a little while. The shell roast was a huge success and mostly devoured; I’m glad a little was leftover because there are few things I love more than really great cold roast beef. Especially when it’s a superior hunk of roast.

So I shaved a little of the beef into thin slices and knocked out this delicious sandwich. I lightly toasted an onion roll and slathered homemade mayo on the bottom half. On the top half I smeared a bit of incendiary spicy mustard from Phillipe’s (the LA landmark restaurant which introduced the world to the French Dip sandwich). Two big slices of brandywine tomatoes went on the bottom bread and over that a mound of that shaved beef. I added a slice of Jarlsberg cheese and topped the cheese with a clutch of leftover salad (iceberg, arugula, radicchio, shaved fennel, and crumbled goat cheese). I put the top bread on the and closed up the sandwich, which I promptly ate without ceremony. And the sando was AMAZEBALLS, as they say.

Not pictured is the bottle of Asahi Black Lager that I drank with the sandwich.

* and maybe eat the horse afterwards. Hey, I’m OMNIVOROUS!

Zaru Soba

20130605-130759.jpg

Cool and refreshing zaru soba!

Summer is nigh upon us and as the weather heats up it’s natural to crave foods that are cooling, refreshing, healthy, and light. Sometimes when the sun’s beating down and the humidity is creeping up I crave Zaru Soba, a classic Japanese dish of chilled noodles with a cooling dipping sauce on the side. It’s pretty simple to make, very healthy for you, and it’ll definitely refresh you on a sultry day.

The dish is made from soba noodles that have been boiled for three minutes and then drained and washed in cold water to stop the cooking process. They should be a little toothsome, but perhaps not as chewy as Italian pastas cooked classically al dente. The soba should be refrigerated for at least an hour before serving. The most widely available soba noodles are made from a combination of buckwheat flour and wheat flour, but for this version of Zaru Soba I used cha soba, noodles that have been made with powdered green tea, which gives them a lovely emerald hue and an elegance that the more rustic soba lacks. If you have a good Japanese market near you look for the green tea noodles — they are fantastic!

Also, if you have access to a decent Japanese market ask for a zaru, which is a sieve-like bamboo mat that chilled soba is traditionally served on. Although you’re supposed to dip the noodles into the cold men-tsuyu sauce on the side, I’ve seen people pour the sauce over the noodles on the zaru; the gaps between the bamboo slats allows for excess sauce to drip off into the plate below, allowing you to have just enough of the dipping sauce clinging to your noodles. It’s simple and quite ingenious.

Men-tsuyu is a simple sauce made from dashi, soy, and mirin and it’s served chilled. I recommend that you start with your own homemade dashi broth (check out my link below) but you can use the instant powdered variety (Hon-dashi from Ajinomoto is one brand I’ve used). Or save even more time and buy the dip pre-made and ready-to-go; you’ll find it in bottles on the shelf at your local Japanese market. It’s not quite as fresh and tasty as the stuff you make from scratch, but it will do in a pinch, especially if this is your first attempt. I really hope you have access to a decent Asian market, but if your neighborhood doesn’t have one try online at asianfoodgrocer.com, which should have everything you need.

The noodles are topped with lots of sliced scallions and shredded nori (dried pressed seaweed — ya know, the kind you wrap up sushi rolls with). In addition I added a sprinkle of black sesame seeds, a few daikon sprouts, and some little bits of crunchy toasted brown rice (genmai), which is typically tossed into green tea for a rich, roasty flavor but which I like to add to the noodles for a little textural zip.

The men-tsuyu should be served in a bowl on the side, with wasabi as a option to mix into it. A little grated fresh ginger might be a nice substitute if you’d like. Sometimes I’ll also add a little shake of ichimi togarashi, a lovely Japanese chili powder, for a bit of extra heat to the dipping sauce. I used fresh wasabi root grated on a sharkskin-lined paddle designed for that sole purpose, but both fresh wasabi root (and the sharkskin grater) are rare and expensive. Use prepared wasabi in a tube or a paste of wasabi prepared from powder.

Men-tsuyu noodle dipping sauce:

  • 2 cups ichiban dashi (made from kombu and katsuobushi)
  • 1/3 cup soy sauce
  • 1/3 cup mirin (Japanese cooking wine)
  • 1 teaspoon sugar

Notes on the noodles:

  • cook in rapidly boiling water for three minutes (if it foams turn heat down)
  • drain and rinse immediately under cold running water
  • drain well again and chill for about an hour (or more)
  • put noodles on the zaru (or in a shallow bowl)
  • top with nori, scallions, daikon sprouts, sesame seeds, and/or crunchy genmai
  • serve with wasabi on the side
  • eat up!

Use the recipe for ichiban dashi is my miso soup post: https://spencerhgray.wordpress.com/2012/02/25/miso-hungry/

20130605-130832.jpg

Don’t these chilled noodles look yummy?

Misoyaki Wild Salmon

Me so hungry for miso salmon.

Me so hungry for miso salmon.

This is a version of that ubiquitous sushi joint staple, misoyaki black cod, popularized with a vengeance at Matsuhisa restaurant here in LA (and at over thirty other affiliated restaurants internationally) by famed Japanese chef Nobu Matsuhisa. It’s Nobu’s signature dish, and the impact of his influence is felt in nearly every sushi bar in American, where some version of miso-marinated broiled fish is on virtually every menu. And for good reason as it’s damn good — sweet, salty, tender, and rich. It can feel fancy or it can be served very simply, almost rustically. It makes a great lunchtime or dinnertime main course, or it can go alongside other Asian dishes for a larger spread.

I love to make it with black cod, of course, or butterfish or ling cod or Chilean seabass or pretty much any other fish that is either delicate or has a decent fat content. I was initially going to make this with black cod, but I found some beautiful and very fresh wild salmon and decided to go with that instead.

I deviate from Nobu’s original recipe by adding a bit more flavoring to the marinade; if you know me you know that I can’t resist tinkering with classics in the hopes of finding greater complexity and depth of flavor — hence the addition of ginger and garlic and salt and pepper. I recommend marinating the fish for at least six hours, so make the marinade in the morning and drop the fish in. By dinnertime you’ll be good to go. If you really want to plan ahead you could marinate the salmon overnight, although I wouldn’t go for two days as the sodium in the marinade could dry out the fish and make the miso flavor too assertive.

Serve this with steamed white rice and maybe some stir-fried bok choy or other Asian greens. I also recommend having on the side a little soy sauce and something spicy like sambal oelek or sriracha.

What you need:

  • 1 pound wild salmon filet, skinned with pin-bones removed
  • 3 tablespoons mirin
  • 3 tablespoons sake
  • 2 tablespoons water
  • 1/3 cup granulated sugar
  • 1/2 cup shiro miso paste (very pale yellow “white” miso)
  • 2 teaspoons finely minced ginger
  • 1 teaspoon finely minced garlic
  • 1/2 teaspoon kosher salt
  • 1/4 teaspoon ground white pepper
  • 2/3 cups of chopped scallions (as a garnish)

What you gotta do:

First cut the salmon filets into four evenly-sized pieces. Place the filets in a flat plastic container with a lid or a glass pan that you can cover with plastic wrap; use anything except a metal container that could be potentially reactive (i.e. aluminum). Also, choose your container wisely; you want the fish to be snug in whatever container you choose so that the fish is nestled in and covered fully by the marinade. Refrigerate fish while you make the marinade.

In a small pot mix the mirin, sake, and water. Heat over medium-high heat until boiling and add the sugar, whisking until it dissolves. Turn off the heat and whisk in the miso, ginger, garlic, salt, and white pepper. Transfer the marinade to a bowl and allow it come to room temperature. Pour marinade over the fish and turn pieces to fully coat with the miso. Cover and refrigerate.

Now wait patiently a few hours. To cook turn on your broiler and set the oven rack about six inches away from the heating element, be it flame or electric coil. Remove the fish from the marinade and place on a sheet pain that been very slightly oiled. Any excess marinade you can pour into a small pot and bring quickly to a boil. Turn off heat. Now you can use the marinade to baste the fish.

Put pan with salmon into the oven and broil for about three minutes. Remove fish from oven and, using a pastry brush, baste fish with more marinade. Return the fish to the oven and broil for another two or three minutes, approximately. You want the edges slightly charred, so when that occurs remove the salmon and prod it to check for doneness. I like it cooked through but very tender and a bit rare. Touch it with your finger — the flesh should have some softness to it. If you suspect it’s not cooked enough to your taste, turn the oven off and return the fish to oven. Allow it to cook with the oven’s residual heat until it’s firmer and more to your liking.

Transfer fish to a platter and serve dinner!

IMG_1705

Super-succulent salmon served for supper. Say that five times fast!

Super-Healthy Krunchy Kale Salad

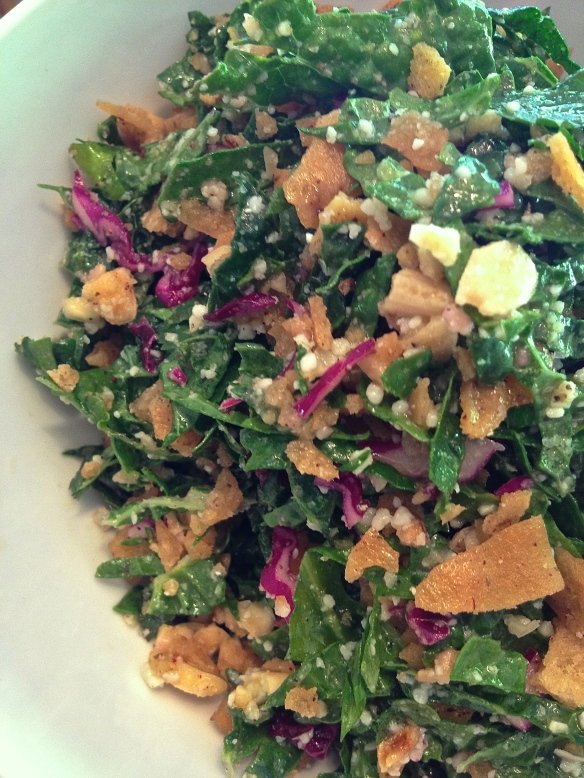
Super-healthy krunchy kale salad is good for the body and easy on the eyes.

Super-healthy krunchy kale salad is good for the body and easy on the eyes.

This salad is very easy to make and it’s a great introduction to kale for people who are convinced they don’t like greens. It’s also damn good for you, kale being chock full of vitamin K, vitamin A, vitamin C, vitamin B6, calcium, magnesium, folate, iron, dietary fiber, thiamin, and protein. So now you have no excuse for not eating this salad!

To make the salad take a bunch of Tuscan kale (the kind with the very dark green, petal-shaped leaves that are flatter than the standard curly-leaf kale) and pull the leaves off of the stems. The stems can be quite bitter and are too chewy to be pleasant anyway, so discard the stems. Wash the kale thoroughly in cold water and then spin dry in a lettuce spinner (or drain and pat dry very well with a clean towel. With a sharp knife chop the kale into relatively fine shreds. Don’t worry about it being uniform; nobody’s judging you on your kale-kutting. Put the kale into a mixing bowl and squeeze one lemon over it. Add two tablespoons of extra virgin olive oil, one garlic clove (smashed and finely minced), about a teaspoon of kosher salt, and a bunch of cracked black pepper. Using your hands toss everything very well. Let the salad sit in the refrigerator for at least one hour.

After an hour or so add a half cup of finely sliced red cabbage, a half cup of crushed pita chips (I use Waleed’s brand.), a quarter cup of crumbled aged manchego cheese, about two tablespoons of crushed almonds (slivered is fine), and about a tablespoon of chopped cilantro. Toss it all together and then check your seasoning — adjust salt and pepper to taste. Now eat it! And feel that healthy goodness course through your body.

Frito Pie, Y’all!

20130517-103948.jpg

Would you believe that Frito pie is actually good for you? Well, it ain’t.

Frito Pie has been on my mind of late. The warm weather has me conjuring up thoughts of State Fairs and picnics and baseball games and other specifically American outdoor events that suggest foods eaten out of hand and foods that defy all conventional “healthy-eating” sensibilities. Frito Pie is one food that fits both criteria — it’s portable and well, disposable, and it’s virtually devoid of any redeeming nutritional value. However, it is super-yummy in all its gleefully white-trashy, grease-bomby way. I like it! It reminds me of my youth and my Southern ties, of hot weather and festival foods.

Now there’s a school of Frito Pie theory that suggests a baked casserole sort of construction, like some kind of bastardized Tex-Mex lasagna or ghetto-style enchiladas. Sure, you bake a bunch of Fritos (and no other corn chip is acceptable) with chili or ground beef with cheese and salsa and you know that’s going to be tasty treat. But to me that’s not really Frito Pie even if it kind of resembles a pie; to me Frito Pie is the so-called “walking taco” whereby you cut open a snack-sized bag of Fritos (the one and only) and you dump into it some hot chili (preferably beanless), some grated cheese, some sour cream and then maybe some other garnishes like jalapenos, hot sauce, chopped scallions, guacamole, etc. You scarf that down with a plastic fork (or spork, if you should be so lucky) and wash that down with an ice-cold PBR or Dixie (or Shiner Bock, if you should be so lucky) and that’s good eatin’, y’all!

For an afternoon snack today I made a totally delish Frito Pie. Because I had only a large bag of Fritos, I put it into a plastic deli cup and I ate it with a plastic fork. This presentation approximated the portability of eating out of a greasy plastic bag but was way neater. It went a little something like this….

  • 1 cup of Fritos dumped into a 16-ounce plastic container
  • 3/4 cup of basic meaty beanless chili put on top of that
  • 1/2 cup of grated “Mexican-style” cheese (jack & cheddar) scattered over the hot chili
  • 1/4 cup sour cream dumped into the container slightly off to the side
  • 1/4 cup chopped fresh avocado, dumped into the container slightly off to the side
  • 1 tablespoon chopped cilantro put on top
  • 1 tablespoon chopped green onion, on top
  • 1 teaspoon (or more!) hot sauce. I used Cholula, which is awesome.
  • stick a plastic fork in it
  • eat!

So, if you’re hankering for something that isn’t remotely healthy, try some Frito Pie. You can’t live on vegan kale salad alone, ya know!

20130517-104031.jpg

But it sho is yummy!

I’ve included a basic chili recipe. This is simple chili not meant to be eaten as a main course but to go on top of hot dogs, burgers, and things like Frito Pie.

Basic Chili:

  • 1 tablespoon butter
  • 1 tablespoon vegetable oil
  • 1 pound lean ground beef
  • salt and pepper
  • 1/2 cup chopped onion
  • 1/2 cup chopped red or green bell pepper
  • 2 cloves garlic, minced
  • 2 tablespoons tomato paste
  • 1 tablespoon flour
  • 1 cup beer
  • 1 can (14.5 ounces) diced tomatoes
  • 1 cup beef broth
  • 1 tablespoon chili powder
  • 1 tablespoon ground cumin
  • 1 teaspoon salt
  • 1 teaspoon ground black pepper
  • 1 teaspoon brown sugar
  • 1 teaspoon dried oregano or marjoram
  • 1/2 teaspoon ground coriander
  • 1/2 teaspoon ground cayenne

To make the chili melt the butter with the oil in a 4-quart heavy-bottomed pot set over medium heat. Turn heat up to high and add the ground beef. Season beef with salt and pepper to taste and brown well. Add the onions and garlic and cook for a couple of minutes until softened. Add tomato paste and cook that, stirring around, until fragrant, about 15 seconds. Sprinkle the flour over the beef and onion mixture and stir well. Add beer and cook until the alcohol smell has dissipated. Add all remaining ingredients. Stir well to combine. Bring to a low boil and then reduce heat to low. Simmer for a minimum of 30 minutes, stirring occasionally. I like to cook it gently for at least an hour until everything breaks down nicely and the excess water has evaporated. Keep in mind that this chili is better the next day, so plan ahead if you can.

Today’s Salad: Supercrunch!

20130516-133115.jpg

It’s getting warm, which means it’s time for Today’s Salad!

Today’s salad is a precocious, super-crunchy combination iceberg lettuce, Upland cress, radicchio, celery, French radishes, Persian cucumbers, Kumato brown tomatoes, chopped up aged Beemster cheese, and crushed crunchy pita chips (from Waleed’s). The dressing is lime juice, white wine vinegar, honey mustard, white honey, extra virgin olive oil, kosher salt, and white pepper.

It was delicious and texturally fun. And great on a warm day!

Dungeness Crab & Avocado Omelet

20130513-183729.jpg

A decadent and lush omelet.

Sunday was Regina’s second Mother’s Day as a bona fide mom (and not just as a super-duper-stepmom). Naturally Bennet and I treated her to a day of yummy-delicious foods that would help make her feel special and loved. Breakfast was headlined by a dungeness crab & avocado omelet with a hollandaise sauce made with a pinch of cayenne and celery salt. Also on the plate was a toasted English muffin (from Bay’s, our favorite muffin maker) with a dab of Irish butter, a slice of crispy applewood-smoked bacon (from Applegate), and a fruit salad of diced pineapple, watermelon, and Hami melon (sort of an elongated Asian cantaloupe). A glass of freshly squeezed tangerine juice completed this perfect brekkie.

After the eggs are mostly set, add the warm crab and avocado on the half closest to you.

After the eggs are mostly set, add the warm crab and avocado on the half closest to you.

To make one omelet you’ll need:

  • 2 eggs
  • good unsalted butter, about two or three tablespoons
  • 1/2 cup to 2/3 cup freshly picked and cooked Dungeness crab
  • 2 or 3 slices of ripe avocado
  • salt & pepper
  • hollandaise sauce, recipes follows
  • cilantro leaves for garnish
  • a non-stick 9-inch omelet pan with a lid
  • a heat-resistant silicon spatula

Now do this:

First, make the hollandaise sauce and set it aside according to the directions below.

With a fork whisk the eggs in a bowl until very uniform in color and consistency. In a small pan (not the omelet pan) melt about a tablespoon of the butter over low heat. When the butter is completely melted add the crab. Warm the crab gently and thoroughly and then turn off the heat.

Now heat the omelet pan over medium-high heat and add about a tablespoon of butter. When the butter has melted tilt the pan in all directions to make sure the butter coats the bottom surface of the pan completely. Pour in the eggs and using your spatula gently push the eggs toward the middle. Again, tilt the pan in a circular fashion to spread out the whipped eggs. Season to taste with salt and pepper. Reduce the heat to medium-low and cover with the lid. Cook the eggs (maybe 30 to 60 seconds) covered until just about set, but still slightly moist-looking.

Add the warmed crab to the eggs, spreading it out on half of the omelet surface, preferably the half closest to you. Top crab with avocado. Season with a bit more salt and pepper. Using your spatula gently flop the other half of the cooked eggs over the crab and avocado. Turn off heat and allow the omelet to warm through in the warm pan for about a minute.

Now gently slide the omelet out of the pan onto a plate. Top with about a quarter cup of warmed hollandaise sauce and a clutch of cilantro. Serve warm and eat immediately!

Hollandaise Sauce for Crab Omelets

  • 3 egg yolks, room temperature
  • 1 tablespoon heavy cream
  • 2 sticks of unsalted butter, cut into 1/2-inch dice, at room temperature
  • 2 tablespoons lemon juice
  • 1/4 teaspoon salt
  • 1/8 teaspoon celery salt
  • 1/8 teaspoon cayenne pepper
  • pinch of white pepper
  • room temperature water

Set up a double-boiler. That’s going to be a medium-sized pot with a stainless steel bowl that fits in the top comfortably. Use a deep enough pot so that the bowl has at least four inches of clearance below it. Fill the pot with 2 inches of water in the bottom. Bring to a boil and then reduce to a simmer.

Put the egg yolks and cream into the bowl. Whisk gently together. Placed bowl over the simmering water and whisk consistently (but not too vigorously) until the eggs have thickened slightly. If the eggs get a little clumpy you can add a teaspoon or so of water to thin it out, whisking until smooth.

Now add butter, a few chunks at a time, until it melts. You need to whisk constantly after each addition in order for the butter and eggs to emulsify (combine smoothly). When you’ve whisked in all the butter (which should take about six to eight minutes) add the lemon juice and whisk it in until smooth. Add spices. Now check your consistency. Your hollandaise should be smooth, not too thick, and it should flow. If it seems dense, whisk in a little water.

Now, set aside the bowl of hollandaise (off the double boiler) until you’re ready to top your eggs. Keep your pot of water at the ready. You can replace the bowl over the water, turn the simmer back on, and reheat your hollandaise just before you’re ready to assemble. Again, when you reheat the sauce, if it thickens too much, whisk in a bit of water to thin and smooth it out.

20130513-183851.jpg

Yummy brekkie!

Today’s Salad: Poached Egg & Arugula

20130514-162145.jpg

Honestly, a poached egg improves just about anything!

Today’s salad is a healthy little number. I poached an egg and perched it atop a mound of wild arugula, chopped cooked turkey bacon, shaved red onion, and little croutons made from toasted Ezekial bread (a sprouted-grain loaf). The dressing is a simple combination of a little white wine vinegar, dijon mustard, lemon juice, agave nectar, and extra virgin olive oil. A scattering of chives and bit of bright green basil oil completed the dish. It was light and lovely.

Easy Tasty Vegan Pizza

IMG_1461

Spicy veggie (and vegan) pizza is a snap to make.

This isn’t much of a recipe post, but more of a suggestion. I whipped up this lovely vegan pizza the other day and it exceeded expectations. Now I’m not a vegan (I’m OMNIVOROUS, baby!) and my tolerance for fake vegan cheese has its limits, but this pizza, notwithstanding the “cheddar-style” rice-based “cheese product” that melted inconsistently over the top, was just dynamite. I’m not going to measure it all out for you this time, but this what I did, more or less.

I had half an Italian eggplant, which was peeled. I diced the eggplant and salted it with a sprinkle of kosher salt. I let that sit for about 20 minutes and then I rinsed the eggplant and dried it well by squeezing it gently with a paper towel. I then sautéed the eggplant in olive oil until nicely browned. Also, I blanched some Tuscan kale in boiling salted water for two minutes. I dropped that into an ice bath to cool it down and then I drained it. I chopped it up nice and fine. I then chopped a little onion and browned that quickly in a pan. I preheated the pizza stone in my oven for 30 minutes at 550ºF (do it on a sheet pan, totally fine).

I took a nice, very flat whole wheat pita and I drizzled a little bit of olive oil over one side. I then spread over it a little homemade tomato sauce (a good jarred one is fine) and then added sparingly a little of each topping: kalamata olives, cooked eggplant, sautéed onions, blanched kale, fresh tomatoes, and pickled jalapenos. I added a few torn pieces of pre-sliced cheddar-style rice (or soy) cheese. I baked it on the pizza stone for about ten minutes. It was, how you say, AMAZEBALLS!

IMG_1460

Yummy and satisfying.