Roast Beast Sandwich

20130805-134927.jpg

Leftovers make a lovely lunch.

I could make a hundred excuses of why I haven’t been posting to OMNIVOROUS lately and nearly half of those would be true, but the real truth is that I’ve been busy, busy, busy. What with two kids and a hectic work schedule (and an incurable addiction to Instagram) I’ve hardly had time to write a word. But recently I’ve been urged by a number of people to take up the quill again and resume my blogging. Apparently a few of you kind readers had missed my musings. Thank you for the encouragement; I’ll try to get back on the horse and ride it.*

Today’s brief post is about using leftovers to good effect. The night before I made this killer sandwich I’d cooked a large prime shell roast. If you’re not familiar with the term a shell roast is basically a huge New York strip steak roasted in the oven. This one was eight pounds, the equivalent of about ten big thick delicious New Yorks stuck together. I’d seasoned it simply and rubbed it with olive oil. I roasted it at 325ºF for about an hour. I pulled it out when I got a temp reading of 120ºF on my instant-read thermometer. This is considered rare but I knew it would continue cooking outside the oven for a little while. The shell roast was a huge success and mostly devoured; I’m glad a little was leftover because there are few things I love more than really great cold roast beef. Especially when it’s a superior hunk of roast.

So I shaved a little of the beef into thin slices and knocked out this delicious sandwich. I lightly toasted an onion roll and slathered homemade mayo on the bottom half. On the top half I smeared a bit of incendiary spicy mustard from Phillipe’s (the LA landmark restaurant which introduced the world to the French Dip sandwich). Two big slices of brandywine tomatoes went on the bottom bread and over that a mound of that shaved beef. I added a slice of Jarlsberg cheese and topped the cheese with a clutch of leftover salad (iceberg, arugula, radicchio, shaved fennel, and crumbled goat cheese). I put the top bread on the and closed up the sandwich, which I promptly ate without ceremony. And the sando was AMAZEBALLS, as they say.

Not pictured is the bottle of Asahi Black Lager that I drank with the sandwich.

* and maybe eat the horse afterwards. Hey, I’m OMNIVOROUS!

Zaru Soba

20130605-130759.jpg

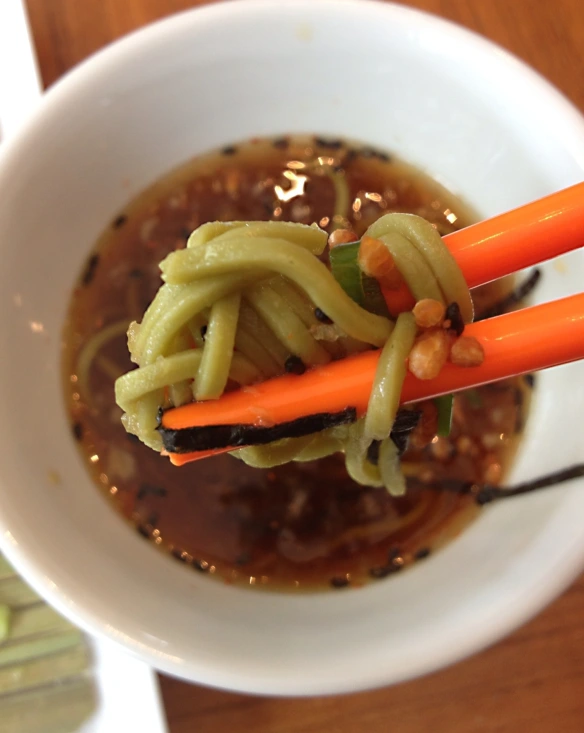
Cool and refreshing zaru soba!

Summer is nigh upon us and as the weather heats up it’s natural to crave foods that are cooling, refreshing, healthy, and light. Sometimes when the sun’s beating down and the humidity is creeping up I crave Zaru Soba, a classic Japanese dish of chilled noodles with a cooling dipping sauce on the side. It’s pretty simple to make, very healthy for you, and it’ll definitely refresh you on a sultry day.

The dish is made from soba noodles that have been boiled for three minutes and then drained and washed in cold water to stop the cooking process. They should be a little toothsome, but perhaps not as chewy as Italian pastas cooked classically al dente. The soba should be refrigerated for at least an hour before serving. The most widely available soba noodles are made from a combination of buckwheat flour and wheat flour, but for this version of Zaru Soba I used cha soba, noodles that have been made with powdered green tea, which gives them a lovely emerald hue and an elegance that the more rustic soba lacks. If you have a good Japanese market near you look for the green tea noodles — they are fantastic!

Also, if you have access to a decent Japanese market ask for a zaru, which is a sieve-like bamboo mat that chilled soba is traditionally served on. Although you’re supposed to dip the noodles into the cold men-tsuyu sauce on the side, I’ve seen people pour the sauce over the noodles on the zaru; the gaps between the bamboo slats allows for excess sauce to drip off into the plate below, allowing you to have just enough of the dipping sauce clinging to your noodles. It’s simple and quite ingenious.

Men-tsuyu is a simple sauce made from dashi, soy, and mirin and it’s served chilled. I recommend that you start with your own homemade dashi broth (check out my link below) but you can use the instant powdered variety (Hon-dashi from Ajinomoto is one brand I’ve used). Or save even more time and buy the dip pre-made and ready-to-go; you’ll find it in bottles on the shelf at your local Japanese market. It’s not quite as fresh and tasty as the stuff you make from scratch, but it will do in a pinch, especially if this is your first attempt. I really hope you have access to a decent Asian market, but if your neighborhood doesn’t have one try online at asianfoodgrocer.com, which should have everything you need.

The noodles are topped with lots of sliced scallions and shredded nori (dried pressed seaweed — ya know, the kind you wrap up sushi rolls with). In addition I added a sprinkle of black sesame seeds, a few daikon sprouts, and some little bits of crunchy toasted brown rice (genmai), which is typically tossed into green tea for a rich, roasty flavor but which I like to add to the noodles for a little textural zip.

The men-tsuyu should be served in a bowl on the side, with wasabi as a option to mix into it. A little grated fresh ginger might be a nice substitute if you’d like. Sometimes I’ll also add a little shake of ichimi togarashi, a lovely Japanese chili powder, for a bit of extra heat to the dipping sauce. I used fresh wasabi root grated on a sharkskin-lined paddle designed for that sole purpose, but both fresh wasabi root (and the sharkskin grater) are rare and expensive. Use prepared wasabi in a tube or a paste of wasabi prepared from powder.

Men-tsuyu noodle dipping sauce:

  • 2 cups ichiban dashi (made from kombu and katsuobushi)
  • 1/3 cup soy sauce
  • 1/3 cup mirin (Japanese cooking wine)
  • 1 teaspoon sugar

Notes on the noodles:

  • cook in rapidly boiling water for three minutes (if it foams turn heat down)
  • drain and rinse immediately under cold running water
  • drain well again and chill for about an hour (or more)
  • put noodles on the zaru (or in a shallow bowl)
  • top with nori, scallions, daikon sprouts, sesame seeds, and/or crunchy genmai
  • serve with wasabi on the side
  • eat up!

Use the recipe for ichiban dashi is my miso soup post: https://spencerhgray.wordpress.com/2012/02/25/miso-hungry/

20130605-130832.jpg

Don’t these chilled noodles look yummy?

Super-Healthy Krunchy Kale Salad

Super-healthy krunchy kale salad is good for the body and easy on the eyes.

Super-healthy krunchy kale salad is good for the body and easy on the eyes.

This salad is very easy to make and it’s a great introduction to kale for people who are convinced they don’t like greens. It’s also damn good for you, kale being chock full of vitamin K, vitamin A, vitamin C, vitamin B6, calcium, magnesium, folate, iron, dietary fiber, thiamin, and protein. So now you have no excuse for not eating this salad!

To make the salad take a bunch of Tuscan kale (the kind with the very dark green, petal-shaped leaves that are flatter than the standard curly-leaf kale) and pull the leaves off of the stems. The stems can be quite bitter and are too chewy to be pleasant anyway, so discard the stems. Wash the kale thoroughly in cold water and then spin dry in a lettuce spinner (or drain and pat dry very well with a clean towel. With a sharp knife chop the kale into relatively fine shreds. Don’t worry about it being uniform; nobody’s judging you on your kale-kutting. Put the kale into a mixing bowl and squeeze one lemon over it. Add two tablespoons of extra virgin olive oil, one garlic clove (smashed and finely minced), about a teaspoon of kosher salt, and a bunch of cracked black pepper. Using your hands toss everything very well. Let the salad sit in the refrigerator for at least one hour.

After an hour or so add a half cup of finely sliced red cabbage, a half cup of crushed pita chips (I use Waleed’s brand.), a quarter cup of crumbled aged manchego cheese, about two tablespoons of crushed almonds (slivered is fine), and about a tablespoon of chopped cilantro. Toss it all together and then check your seasoning — adjust salt and pepper to taste. Now eat it! And feel that healthy goodness course through your body.

Easy Tasty Vegan Pizza

IMG_1461

Spicy veggie (and vegan) pizza is a snap to make.

This isn’t much of a recipe post, but more of a suggestion. I whipped up this lovely vegan pizza the other day and it exceeded expectations. Now I’m not a vegan (I’m OMNIVOROUS, baby!) and my tolerance for fake vegan cheese has its limits, but this pizza, notwithstanding the “cheddar-style” rice-based “cheese product” that melted inconsistently over the top, was just dynamite. I’m not going to measure it all out for you this time, but this what I did, more or less.

I had half an Italian eggplant, which was peeled. I diced the eggplant and salted it with a sprinkle of kosher salt. I let that sit for about 20 minutes and then I rinsed the eggplant and dried it well by squeezing it gently with a paper towel. I then sautéed the eggplant in olive oil until nicely browned. Also, I blanched some Tuscan kale in boiling salted water for two minutes. I dropped that into an ice bath to cool it down and then I drained it. I chopped it up nice and fine. I then chopped a little onion and browned that quickly in a pan. I preheated the pizza stone in my oven for 30 minutes at 550ºF (do it on a sheet pan, totally fine).

I took a nice, very flat whole wheat pita and I drizzled a little bit of olive oil over one side. I then spread over it a little homemade tomato sauce (a good jarred one is fine) and then added sparingly a little of each topping: kalamata olives, cooked eggplant, sautéed onions, blanched kale, fresh tomatoes, and pickled jalapenos. I added a few torn pieces of pre-sliced cheddar-style rice (or soy) cheese. I baked it on the pizza stone for about ten minutes. It was, how you say, AMAZEBALLS!

IMG_1460

Yummy and satisfying.

Roasted Paprika-Rubbed “Rock N Roll” Chicken Wings

IMG_1529

Overnight marinating makes these wings super-flavor-flav!

You guys know how much I just LOVE chicken wings, don’t ya? To give you some idea I’ve already published five other posts about wings and I’m sure I’ve alluded to wings in at least six other posts (I’ve linked to the good ones below.) There’s not much more I can add to the pre-existing wing conversation; however, I will reiterate that I absolutely love crisp & chewy skin, I adore the moist tender meat within, and I find irresistible what I like to call the “primal gnaw”, that nearly instinctual desire to chew cooked meat off of bones, using only your hands, in a greasy-fingered manner that recalls primitive man. It’s primal and messy and communal and well, fun.

My usual M.O. when making wings is to par-cook them; first I’ll bake them at a low temperature until about 80% cooked and then I’ll fry them until crisp. This two-pronged approach yields perfectly crisp wings every time. However, cooking them this way means you can’t really infuse the chicken itself with a lot of other flavorings (dried spices and marinades will dissipate the instant the wing hits the hot oil) and you need a finishing sauce of some kind to add some zest — classic Buffalo sauce, bbq sauce, honey-soy sauces, etc. I love the sauces, don’t get me wrong, but the longer the wings are saturated with sauce the father away they get from the skin-crunch ideal.

And of course you can achieve very flavorful wings with other methods — low-oil skillet-frying, grilling — but they don’t come close to deep-frying for crispy skin. I wanted a wing that was shot-through with flavor but came close to the great crispity-crunchity of fried wings. After a little tinkering I found a method that was worth sharing: high-heat roasting wings that have been coated with a moist dry rub, finished under the broil. The results were awesome — crisp and flavorful with no moist sauce to undercut the crunch. I ended up drizzling the still-hot wings with a wee bit of honey and they were AWESOME!

You’ll need:

  • 12 largish chicken wings (tips removed) cut into 24 individual pieces
  • 2 teaspoons smoked paprika
  • 2 teaspoons kosher salt
  • 2 teaspoons ground black pepper
  • 1 teaspoon ground cayenne pepper
  • 1 teaspoon ground coriander
  • 1 teaspoon celery salt
  • 1 teaspoon onion powder
  • 1 teaspoon garlic powder
  • 1/2 teaspoon ground sage
  • 1 tablespoon mirin (Japanese cooking wine) or anything similar
  • 1 tablespoon soy sauce
  • 3 tablespoons vegetable oil, plus a little extra when you cook them
  • honey for a last-minute drizzle

Now do this:

Put the cut wings into a large mixing bowl. Mix all the dried spices together and dump it over the wings. Using your hands coat the wings thoroughly with spices. Add the mirin, the soy sauce, and the oil. Coat wings thoroughly with wet ingredients and stick them into a ziploc bag. Wait impatiently for 24 hours. Preheat oven to 525º.

Place wings on a rack set over a sheet pan. Roast wings for 10 or 12 minutes or until the edges of the wings look crisp but not charred. Remove the pan from the oven and allow them to rest for about 15 minutes. Set the oven to broil and place a rack about six inches from the heating element.

Drizzle a little vegetable oil on the “up-side” of the wings. Broil 1 or 2 minutes or until nicely crunchy and a bit charred. Flip the wings and repeat the oil and the broil. Congrats! Your wings are finished.

Drizzle with a little honey if you wish.

Why are they called Rock N Roll Wings? Why not? They rock.

Check out my earlier wing-related posts:

Crispy Wok-Fried Wings: https://spencerhgray.wordpress.com/2013/01/13/crispy-wok-fried-chicken-wings/

Honey-Ginger Chicken Wings, Again: https://spencerhgray.wordpress.com/2011/10/27/honey-ginger-chicken-wings-again/

Late-Night-Guilty-Pleasure Wings: https://spencerhgray.wordpress.com/2011/08/25/late-night-guilty-pleasure-chicken-wings/

Chicken Wings & The Primal Gnaw: https://spencerhgray.wordpress.com/2011/07/23/chicken-wings-the-primal-gnaw/

It’s Game Time:     https://spencerhgray.wordpress.com/2011/02/03/its-game-time/

Grilled Tempeh & Portobellos

20130422-202411.jpg

Very vegan and very delicious.

In the course of my work I’m frequently called upon to make vegan dishes for guests and my coworker Ian (nicknamed Vegan Boy). Here’s one I knocked out the other day, on a whim, and it came out pretty spectacularly, if I may say so myself.

I bought a slab of tempeh, a staple vegetarian food stuff originally from Indonesia, which is a cake of pressed fermented soy beans. Because of its dense, hearty character tempeh makes for a decent meat substitute and can be quite tasty marinated in something flavorful and then grilled.

First I sliced the tempeh into slices about a half-inch thick. I whisked up a marinade composed of about a quarter cup of ponzu sauce, a quarter cup of olive oil, some minced garlic, a little minced marjoram, a teaspoon of balsamic vinegar syrup (a reduction of simple balsamic vinegar from Modena with some sugar added to it), and some salt and pepper. I coated the tempeh slices with the marinade and let it sit for about an hour.

I cut a portobello mushroom into thick slices and marinated those as well. Meanwhile I roasted some broccoli florets in a skillet until a little charred. I also warmed a little homemade tomato sauce in a small pot.

I grilled the tempeh and mushrooms until hot and lightly charred. I put three slices of the tempeh on a sheet pan, topped the tempeh with grilled mushrooms, and then topped the ‘shrooms with a slice of “pepper-jack flavored” soy cheese. I popped the sheet pan into a hot oven (think 400ºF) for about five minutes until the “cheese” melted. I pulled out my vegan creation and pulled out a nice plate.

In the center of the plate I put a little pool of that homemade tomato sauce (a decent store-bought version like Rao’s or Giorgio Baldi’s might work). And then with a spatula I placed my little cheesy tempeh-mushroom creation in the center of the pool. I topped the cheese with some of that roasted broccoli and drizzled a little more balsamic syrup around the vegan grub.

It was damn tasty. At least that’s what Vegan Boy said.

Atlantic Beach Pie

IMG_1344

Amazing Atlantic Beach Pie!

My good friend Margaret turned me on to this recipe, knowing how much I love to make pies and eat pies. One of my favorite pies is Key Lime and this interesting riff on the citrus custard pie turned out to be truly phenomenal. And a breeze to make.

I’m not going to get into a long dissertation on the origins of this pie. I’ve included a link to the original recipe below. Check it out if you want a bit more backstory. But in short, apparently it’s a local specialty of the North Carolina coast. This recipe is from a restaurant called Crook’s Corner in Chapel Hill. The proprietor, Bill Smith, says it takes all of four seconds to make. Although it wasn’t quite that quick, it was incredibly easy.

The most intriguing aspect of the pie is the salty-sweet crust made from crushed saltines. You pair that with a tart lemon-lime custard and pillowy whipped cream and the pie just sings.

This is Bill Smith’s recipe with my notes:

Atlantic Beach Pie

For the crust:

1 1/2 sleeves of saltine crackers

1/3 to 1/2 cup softened unsalted butter

3 tablespoons sugar

For the filling:

1 can (14 ounces) sweetened condensed milk

4 egg yolks

1/2 cup lemon or lime juice or a mix of the two

Fresh whipped cream and coarse sea salt for garnish

Preheat oven to 350 degrees.

Crush the crackers finely, but not to dust. You can use a food processor or your hands. Add the sugar, then knead in the butter until the crumbs hold together like dough. Press into an 8 inch pie pan. Chill for 15 minutes, then bake for 18 minutes or until the crust colors a little.

While the crust is cooling (it doesn’t need to be cold), beat the egg yolks into the milk, then beat in the citrus juice. It is important to completely combine these ingredients. Pour into the shell and bake for 16 minutes until the filling has set. The pie needs to be completely cold to be sliced. Serve with fresh whipped cream and a sprinkling of sea salt.

————————–

I didn’t have an eight-inch pie pan. Nine-inch pans are much more common, so I extended the recipe for the crust a little to make a bit more. I used a full two sleeves of saltines, which I put into a big ziploc bag and crushed with a meat mallet. I left the cracker crumbs pretty chunky. I increased the butter to a little over a half-cup (one stick plus another tablespoon or so) of unsalted butter. I used four tablespoons of sugar in the crust and added 2 tablespoons of water to help make the crust more paste-like and easier to press into the pie pan.

For the filling I didn’t adjust the quantities at all, but I did use a mixture of fresh lemon juice and fresh key lime juice. The end result was excellent — smooth and sweet and tart all at the same time. 

After I baked the pie and the filling was fully set, I set it on a cooling rack to come to room temperature. And then I chilled it for about twenty minutes in the fridge. Meanwhile I prepared some whipped cream to complete the pie. 

Bill’s recipe calls for whipped cream but he doesn’t provide any measurements. I whipped two cups of heavy cream at medium speed until I got medium peaks. I then added two tablespoons of powdered sugar to the cream and beat it at medium-high until I got stiff peaks. A quick tip: when making whipped cream always chill the whisk attachment of your mixer and the mixer bowl with the cream already in it. The cream will whip up faster and fluffier if everything starts chilled. 

Finally, for the finishing touch on each cut slice I sprinkled a bit of Maldon Sea Salt, that lovely large-flaked sea salt from England. It adds a bit of saline crunch on the palate that kicks up the sweetness of the pie.

The original post:

http://www.npr.org/2013/04/11/176279512/a-north-carolina-pie-that-elicits-an-oh-my-god-response

IMG_1341

The chunky-style saltine crust is what differentiates this stellar pie from any old boring lemon pie.

Pan con Tomate

20130416-234928.jpg

Pan con tomate is a national treasure of Spain.

This ubiquitous Spanish starter is the simplest thing in the world to make, but don’t be fooled by the basic nature of the dish. Probably the most famous dish from Catalonia, the beloved pan con tomate is a thing of genius, the sheer simplicity belying a profound complexity of flavor from five ingredients in symbiotic harmony. You start with good, flavorful, rustic bread. You toast it until it’s hot and crusty. Add garlic, tomato, olive oil, and salt. The end result is perfection.

To make pan con tomate at home you need very good bread with some flavor, a hearty crust, and a crumb dense enough to withstand a little manhandling. I like to make it with a sourdough batard, which is a French loaf that’s fatter and more irregular than its cousin the baguette. I cut it on the bias (at an angle) into slices about three-quarters of an inch thick.

20130416-234943.jpg

Fresh tomatoes and good bread.

You can use any kind of grill you like to toast the bread. This time I used a grill pan for the convenience; I didn’t feel like firing up the propane Weber for a few slices of bread, ya know. I’m sure you could broil the bread if you wanted or hold the bread in a pair of tongs and wave it over a roaring oak fire, which would probably be the most authentic method. However you do it, get the bread nice and hot and a little charred on both sides.

Okay, the garlic. Take a peeled clove of fresh garlic and trim off about the end, removing about 25% of the clove off. You’ll scrape the cut end over the hot bread’s surface. For tomatoes I like the medium-sized vine-ripe kind. Cut them into quarters. You need one tomato quarter per slice of bread. You’ll also need extra-virgin olive oil, ideally from Spain; something fruity with some good character. Finally good sea salt. I had on hand some fleur de sel de Camargue but use anything except iodized table salt.

20130416-234959.jpg

Rub the fresh tomatoes on to the cut surface of your crusty bread.

So, to assemble your tasty pan con tomate first grill the bread until crusty. Gently scrape the garlic clove all over one side of the bread. Now rub the tomato into the bread on that same side. A little pulp will rub off, maybe a couple of seeds, definitely some good tomato essence. Now drizzle a generous amount of olive oil over the slice, maybe a teaspoon per slice, and sprinkle some salt over the slice. You can crack some black pepper over it if you’d like, although it’s optional.

Serve with a little manchego cheese or salami or jamon Serrano. Oh, and don’t forget a glass of cheap but tasty red wine!


Ad-hoc Asian Salad

20130417-112158.jpg

Today’s salad is a simple (yet miraculous) combination of leftover cold ramen noodles (the fresh kind, not the fry-dried variety), cold grilled skirt steak cut into thin strips, napa cabbage, iceberg lettuce, radishes, cucumbers, carrots, watercress, scallions, crispy garlic, crispy wontons, and a simple sesame-miso dressing (canola oil, shiro miso paste, sesame oil, rice vinegar, Chinese mustard, salt and pepper). It was yummy!

Not-So-Big Macs!

photo-22

Homemade “Not-So-Big” Macs are a helluva lot better for you than the real deal! And way cuter!

Many people are surprised that I’ll admit to eating fast food every once in a while. Considering my choice of career and the unlimited budget that I have for purchasing the finest food that money can buy and people can eat, sometimes my friends are frankly astonished that I have the occasional craving for Taco Bell or similar trash foods. I suppose every once in a while I need a casual antidote to all the fancy stuff like caviar, foie gras, matsutake mushrooms, pork belly, and lobster tails. At least that’s my excuse, but really I just kinda like the stuff despite the realization that it’ll probably shave some time off my life and contribute to our degrading environment. But in truth I rarely indulge; I eat Taco Bell once a year and McDonald’s with a similar frequency.

But sometimes I really crave a tasty burger, and usually I don’t mean some kind of fancy-schmancy hand-ground meat patty artfully layered with chef-designed, umami-laden, manufactured-in-house condiments. No parmesan crisp or ketchup leather or shiitake bullshit or aged Vermont cheddar or sun-dried tomato or a goddamn brioche bun. I want a thin patty of good beef on a soft, yielding (read cheap) bun with honest-to-goodness Kraft American cheese. Sometimes all I want is a crappy fast-food burger, something gooey, chewy, beefy, sloppy.

However, I want it with killer beef, ideally grass-fed, so that I won’t be burdened with as much (however fleeting) guilt when I bite down into that burger and the hot beef grease courses over my tastebuds. And I want organic tomatoes and lettuce, quality onions, and a good pickle.

Anyway, a few days ago I was in one of my “trashy burger moods”. It hit me as I strolled the aisles at Trader Joe’s; inspiration struck as I spotted a bag of slider buns dotted with sesame seeds, something I’d never seen before. Barely two inches in diameter the little rolls screamed BIG MAC and that ubiquitous commercial ditty ran through my mind like the sexy come-on of a low-rent hooker trolling the unfashionable, less-hospitable end of Sunset Blvd: “two-all-beef-patties-special-sauce-lettuce-cheese-pickles-onions-on-a-sesame-seed-bun”. A shiver ran down my spine and I knew exactly what I was going to eat for dinner that night.

photo-24

Inspiration came in a plastic bag.

Of course a few issues hampered the immediate execution of my “Not-So-Big Mac” or “Mini-Mac”. The Big Mac is constructed of a “triple-bun” with an additional round slab of bread starching up the middle of the burger. I had to create the extra bun slice by carefully trimming the the crust from the tops (or bottoms) of some of the slider buns. This was wasteful, to be sure, but authenticity demands a strenuous attention to detail and, quite possibly, some waste along the way.

Next is the so-called “special sauce” which is simply Russian dressing (1,000 Island being virtually identical). I used my own super-basic recipe of a half-cup of mayo, a quarter-cup of ketchup, two tablespoons of sweet pickle relish, and kosher salt and cracked peppercorn (to taste) all mixed up together. Also on the burger are sour pickle slices (look for dill hamburger chips), shredded iceberg lettuce, one slice of yellow American cheese, and some small pieces of sliced white onions. The sliced onions I soaked in cold water for about five minutes to get rid of the some of the acidity. I drained them well before putting them on the burger.

photo-23

My Mini-Macs were magnificent!

The burger patties themselves I made very thin, less than a half-inch in thickness, and about three-and-a-half inches in diameter. Whenever you make burgers remember that they shrink significantly; how much shrinkage occurs is determined by fat content — more fat means more shrinkage, generally. So for a burger that fits a two-inch bun you need a burger that’s a little larger than three inches. I seasoned the burger patties with just a little salt and pepper right before cooking in a skillet (or on a flat-top griddle).

I heated my skillet over high heat until it was just smoking and swirled in a little vegetable oil. Very quickly I lightly browned the cut sides of all three parts of the bun — the top, the bottom, and the middle piece (which needs to browned on both sides). I kept the toasted buns warm on a small sheet pan in a low oven (about 200ºF) while I cooked the burgers.

I added more vegetable oil to the pan — just enough to coat the bottom evenly. I added the  burger patties; remember two patties per Mini-Mac! I cooked the burgers on one side about two minutes until very browned and a little crisp. I flipped the burgers and added a small slice of American cheese on top of half the burgers*; remember only one slice of cheese for each Mini-Mac! After one more minute of cooking I removed the burgers from the pan and took the warm buns out of the oven.

I assembled the Mini-Macs in the following order, assembling from top to bottom:

  • the bottom of the bun
  • a half-teaspoon of special sauce
  • one pickle chip
  • a few pieces of sliced onion
  • a tiny clutch of lettuce
  • a burger patty with cheese*
  • the “middle bun”
  • a few pieces of sliced onion
  • another tiny clutch of lettuce
  • a “cheeseless” burger patty
  • another half-teaspoon of special sauce
  • another pickle slice
  • the top of the bun

After assembly my fam and I ate them immediately. Both wife and son were appropriately grateful and deemed the Mini-Macs excellent!

* Big Mac scientists for some reason place a slice of unmelted cheese on the burger “underneath” the bottom burger patty, probably to keep the hot cheese from wilting the lettuce too much. However, I prefer melting the cheese on the burger while it cooks (better cheese-gooiness). I’m on the fence about whether the cheese should face up or down when you assemble, although I’m leaning toward cheese-up. You decide.