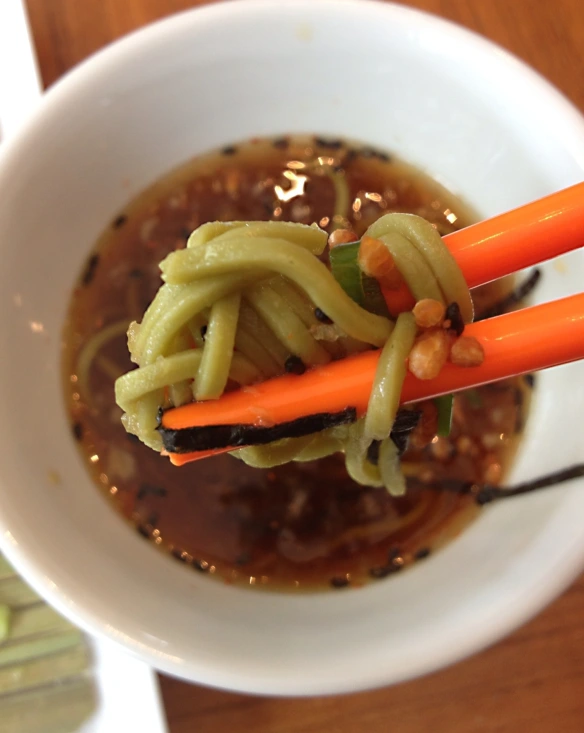
Zaru Soba

20130605-130759.jpg

Cool and refreshing zaru soba!

Summer is nigh upon us and as the weather heats up it’s natural to crave foods that are cooling, refreshing, healthy, and light. Sometimes when the sun’s beating down and the humidity is creeping up I crave Zaru Soba, a classic Japanese dish of chilled noodles with a cooling dipping sauce on the side. It’s pretty simple to make, very healthy for you, and it’ll definitely refresh you on a sultry day.

The dish is made from soba noodles that have been boiled for three minutes and then drained and washed in cold water to stop the cooking process. They should be a little toothsome, but perhaps not as chewy as Italian pastas cooked classically al dente. The soba should be refrigerated for at least an hour before serving. The most widely available soba noodles are made from a combination of buckwheat flour and wheat flour, but for this version of Zaru Soba I used cha soba, noodles that have been made with powdered green tea, which gives them a lovely emerald hue and an elegance that the more rustic soba lacks. If you have a good Japanese market near you look for the green tea noodles — they are fantastic!

Also, if you have access to a decent Japanese market ask for a zaru, which is a sieve-like bamboo mat that chilled soba is traditionally served on. Although you’re supposed to dip the noodles into the cold men-tsuyu sauce on the side, I’ve seen people pour the sauce over the noodles on the zaru; the gaps between the bamboo slats allows for excess sauce to drip off into the plate below, allowing you to have just enough of the dipping sauce clinging to your noodles. It’s simple and quite ingenious.

Men-tsuyu is a simple sauce made from dashi, soy, and mirin and it’s served chilled. I recommend that you start with your own homemade dashi broth (check out my link below) but you can use the instant powdered variety (Hon-dashi from Ajinomoto is one brand I’ve used). Or save even more time and buy the dip pre-made and ready-to-go; you’ll find it in bottles on the shelf at your local Japanese market. It’s not quite as fresh and tasty as the stuff you make from scratch, but it will do in a pinch, especially if this is your first attempt. I really hope you have access to a decent Asian market, but if your neighborhood doesn’t have one try online at asianfoodgrocer.com, which should have everything you need.

The noodles are topped with lots of sliced scallions and shredded nori (dried pressed seaweed — ya know, the kind you wrap up sushi rolls with). In addition I added a sprinkle of black sesame seeds, a few daikon sprouts, and some little bits of crunchy toasted brown rice (genmai), which is typically tossed into green tea for a rich, roasty flavor but which I like to add to the noodles for a little textural zip.

The men-tsuyu should be served in a bowl on the side, with wasabi as a option to mix into it. A little grated fresh ginger might be a nice substitute if you’d like. Sometimes I’ll also add a little shake of ichimi togarashi, a lovely Japanese chili powder, for a bit of extra heat to the dipping sauce. I used fresh wasabi root grated on a sharkskin-lined paddle designed for that sole purpose, but both fresh wasabi root (and the sharkskin grater) are rare and expensive. Use prepared wasabi in a tube or a paste of wasabi prepared from powder.

Men-tsuyu noodle dipping sauce:

  • 2 cups ichiban dashi (made from kombu and katsuobushi)
  • 1/3 cup soy sauce
  • 1/3 cup mirin (Japanese cooking wine)
  • 1 teaspoon sugar

Notes on the noodles:

  • cook in rapidly boiling water for three minutes (if it foams turn heat down)
  • drain and rinse immediately under cold running water
  • drain well again and chill for about an hour (or more)
  • put noodles on the zaru (or in a shallow bowl)
  • top with nori, scallions, daikon sprouts, sesame seeds, and/or crunchy genmai
  • serve with wasabi on the side
  • eat up!

Use the recipe for ichiban dashi is my miso soup post: https://spencerhgray.wordpress.com/2012/02/25/miso-hungry/

20130605-130832.jpg

Don’t these chilled noodles look yummy?

Super-Healthy Krunchy Kale Salad

Super-healthy krunchy kale salad is good for the body and easy on the eyes.

Super-healthy krunchy kale salad is good for the body and easy on the eyes.

This salad is very easy to make and it’s a great introduction to kale for people who are convinced they don’t like greens. It’s also damn good for you, kale being chock full of vitamin K, vitamin A, vitamin C, vitamin B6, calcium, magnesium, folate, iron, dietary fiber, thiamin, and protein. So now you have no excuse for not eating this salad!

To make the salad take a bunch of Tuscan kale (the kind with the very dark green, petal-shaped leaves that are flatter than the standard curly-leaf kale) and pull the leaves off of the stems. The stems can be quite bitter and are too chewy to be pleasant anyway, so discard the stems. Wash the kale thoroughly in cold water and then spin dry in a lettuce spinner (or drain and pat dry very well with a clean towel. With a sharp knife chop the kale into relatively fine shreds. Don’t worry about it being uniform; nobody’s judging you on your kale-kutting. Put the kale into a mixing bowl and squeeze one lemon over it. Add two tablespoons of extra virgin olive oil, one garlic clove (smashed and finely minced), about a teaspoon of kosher salt, and a bunch of cracked black pepper. Using your hands toss everything very well. Let the salad sit in the refrigerator for at least one hour.

After an hour or so add a half cup of finely sliced red cabbage, a half cup of crushed pita chips (I use Waleed’s brand.), a quarter cup of crumbled aged manchego cheese, about two tablespoons of crushed almonds (slivered is fine), and about a tablespoon of chopped cilantro. Toss it all together and then check your seasoning — adjust salt and pepper to taste. Now eat it! And feel that healthy goodness course through your body.

Today’s Salad: Supercrunch!

20130516-133115.jpg

It’s getting warm, which means it’s time for Today’s Salad!

Today’s salad is a precocious, super-crunchy combination iceberg lettuce, Upland cress, radicchio, celery, French radishes, Persian cucumbers, Kumato brown tomatoes, chopped up aged Beemster cheese, and crushed crunchy pita chips (from Waleed’s). The dressing is lime juice, white wine vinegar, honey mustard, white honey, extra virgin olive oil, kosher salt, and white pepper.

It was delicious and texturally fun. And great on a warm day!

Today’s Salad: Poached Egg & Arugula

20130514-162145.jpg

Honestly, a poached egg improves just about anything!

Today’s salad is a healthy little number. I poached an egg and perched it atop a mound of wild arugula, chopped cooked turkey bacon, shaved red onion, and little croutons made from toasted Ezekial bread (a sprouted-grain loaf). The dressing is a simple combination of a little white wine vinegar, dijon mustard, lemon juice, agave nectar, and extra virgin olive oil. A scattering of chives and bit of bright green basil oil completed the dish. It was light and lovely.

Chopped Veggie Picnic Salad

IMG_1414

A bounty of veggies!

I was inspired to make this salad by my father, a man who believes in eating not only in a heathy manner, but in a way that reflects his environmental concerns. To that end he eats small portions, mostly vegetables, and he eschews beef and gluttony. My dad is a vigorous man and will undoubtedly outlive me, due in no small part to his dietary habits. Now I can’t really embrace that particular lifestyle; I’d say my job doesn’t permit me to eat healthfully, but that’s mostly a cop-out. I just like food of all kinds and I like to eat. I’m OMNIVOROUS, after all, and I probably wouldn’t be cooking for a living if I didn’t like to eat just about everything!

My father is partial to chopped salads and a few months ago during his last visit he made an especially tasty salad of all kinds of things including cauliflower and tofu and cabbage and carrots and tomatoes and about thirty other veggies. This recipe is a bit like that — it’s complicated but easy to make, it’s got all kinds of things going on but works in a balanced way, it’s refreshing but filling, and it’s very open to interpretation. Don’t like cabbage? Substitute with fennel. Don’t like bell peppers? Throw in a summer squash. Don’t like carrots? Throw in fresh corn. Don’t like zucchini…you get the picture. Be creative, use what you have in the fridge, use as many vegetables as you can get your hands on.

Anyway, if you make this recipe don’t feel you have to stick to these quantities. Use what you’ve got and don’t be a stickler. Just keep the general idea of the salad and dress it accordingly. I made the salad vegan, but if you want to use regular mayonnaise in the dressing, have at it!

By the way, it’s called a Picnic Salad because you can dress it in advance and serve it casually. Dress the salad early and then stir in the nuts and corn chips right before serving. One note: the salt in the dressing might pull some moisture out of the veggies and it may be a trifle wet after sitting for a couple of hours; just drain off a little of the excess liquid if you notice that occurring.

You will need:

  • 1 1/2 cups vegenaise or regular mayo
  • 1/2 cup white wine vinegar
  • 1/4 cup extra virgin olive oil
  • 2 tablespoons dijon mustard
  • 2 tablespoons toasted white sesame seeds
  • 2 teaspoons kosher salt
  • 2 teaspoons honey
  • 1 teaspoon cracked black pepper
  • 1 teaspoon minced fresh basil
  • 3 cups chopped purple cauliflower
  • 3 cups chopped raw white mushrooms
  • 2 cups coarsely chopped watercress
  • 2 cups coarsely chopped iceberg lettuce
  • 1 1/2 cups of chopped pressed (and/or smoked) tofu
  • 1 1/2 cups coarsely shredded carrots
  • 1 cup chopped purple cabbage
  • 1/2 cup chopped cilantro
  • 1 zucchini, chopped
  • 1 hothouse cucumber, peeled, seeded, and chopped
  • 3 scallions, chopped
  • 1 bell pepper, stemmed, seeded, and chopped
  • 1 celery stalk, chopped
  • 1 cup crushed cashews
  • 1 cup crushed blue corn tortilla chips

Now do this:

Whisk together vegenaise, vinegar, olive oil, mustard, sesame seeds, salt, honey, pepper, and basil. Refrigerate until your salad is assembled.

Toss to combine all of the remaining ingredients above except the nuts and corn chips. Toss with the dressing until nicely coated. Allow the salad to sit, refrigerated, for at least an hour. Drain off any extra liquid and toss in the cashews and blue corn chip. Serve and eat!

Ad-hoc Asian Salad

20130417-112158.jpg

Today’s salad is a simple (yet miraculous) combination of leftover cold ramen noodles (the fresh kind, not the fry-dried variety), cold grilled skirt steak cut into thin strips, napa cabbage, iceberg lettuce, radishes, cucumbers, carrots, watercress, scallions, crispy garlic, crispy wontons, and a simple sesame-miso dressing (canola oil, shiro miso paste, sesame oil, rice vinegar, Chinese mustard, salt and pepper). It was yummy!

The Classic Wedge

While lacking in any actual nutrients, a good wedge salad can be utterly delicious!

It seems amazing that I haven’t posted anything in six weeks! Up until this point I’ve been very attentive about giving my OMNIVOROUS public new posts to chew on, but to say I’ve been busy is an understatement of the first order. Not only do I have my job (the one that provides me with, ya know, money) but I have my son and my little baby girl (currently seven months old) occupying a tremendous amount of my time. Also, I have my dear wife Regina, who I neglect at my peril. She’s got a black belt, after all!

So the blog has been back-burnered for a spell, but I’m back. I really hope to get a few new posts up this week. They might be kinda shy in the content department, but I’ve got to reestablish a groove and even if it’s just a pic of a pretty rockin’ salad, I’ve gotta get started somewhere.

To whit: this mediocre picture of an extra-delicious Classic Wedge Salad, or as Bennet referred to it — a Wedgie Salad, which sounds, shall we say, less than appealing.

I made this crisp and refreshing salad a couple of weeks ago with a slice of crunchy, mild iceberg. When I prepare iceberg lettuce for wedges I trim out the core from a whole head and then I hold the lettuce globe upside-down under the faucet. I turn on the tap to a gentle stream and fill the hole in the lettuce with running cold water (filtered water is better if you’re dubious about your tap water). I’ll place the iceberg upside down like that in a bowl and let the water refresh the lettuce for about 15 minutes. I then invert the head and drain out the water over a colander. I like to place the the lettuce (in the colander) in the fridge until super-cold. When I’m ready to make the salad I cut the head into nice wedges.

This time I garnished the salad with boiled eggs, decent hothouse tomato slices, some old-school California-grown canned black olives, some hearts of palm, Pederson applewood-smoked bacon, and chives. The dressing is my homemade Easy Blue Cheesy dressing.

Of course you can make it however, but I also recommend as toppings sliced radishes, cornichons, pickled red onions, gribenes (crispy chicken cracklings), Persian cucumbers, blanched green beans, fried olives, crumbled egg, chickpeas, red bell pepper confetti, and crispy fried basil. Other great dressing choices are homemade buttermilk ranch, 1,000 Island, homemade catalina, green goddess, or a good balsamic.

You can eat this salad whenever you want, I’m not going to stop you. However, I think it’s perfect as a precursor to a steak dinner or a lobster boil. Something classically American.


The recipe for my Easy Blue Cheesy dressing can be found in this post:

https://spencerhgray.wordpress.com/2012/09/23/todays-salad-greens-blues/

The omnivore has returned!

Today’s Lunch: Chicken Piccata

A light, simple lunch.

I cranked out this tasty lunch the other day at work and my peeps loved it! I cooked some chicken breasts and made a simple piccata-style sauce to spoon over the top. I served it with some crispy little yukon gold potatoes and a salad of romaine, arugula, tomato, red cabbage, spinach, cucumber, crumbled egg, and a little manchego cheese.

Typically chicken or veal piccata starts with cutlets that are breaded with a little egg and flour mixture, but in the interest of keeping it lighter I eschewed that step and simply sautéed the chicken breasts. The tart and zesty drizzle is an herbed lemon-caper pan-sauce made in the same skillet the chicken was cooked in, which allows it to pick up some of those flavorings left in the pan from the chicken.

I’m not going to write out the recipe, I’m just gonna throw it at ya! I’m gonna move fast.

I preheated the oven to 350ºF and then I heated a non-stick, oven-ready skillet over high heat. I generously seasoned three chicken breasts with salt and pepper. When the pan was super-hot I swirled in about two tablespoons of vegetable oil. I added the chicken breasts and browned one side (about three minutes) and then flipped them. I cooked the other side another couple of minutes and then threw the pan into the oven. I baked the chicken for another five minutes and then pulled out the pan from the oven.

I took the chicken out of the pan and put the breasts on a plate and covered them with foil. I poured off most of the oil (leaving maybe a teaspoon in the pan) and then put the skillet back on the stove over medium-high heat. Into the pan I threw one minced garlic clove and about a tablespoon of minced shallot. I stirred that around for thirty seconds to soften the garlic and shallot and then I added two tablespoons of white wine. I scraped the bottom of the pan and boiled off the wine. I added a tablespoon of lemon juice and two tablespoons of capers.

I made a slurry of a half-cup of chicken broth with a tablespoon of corn starch whisked into it. I poured the slurry into the pan and combined everything with a whisk. I seasoned the sauce with more salt and pepper and added about a tablespoon of minced parsley and a teaspoon of minced chives. I brought the sauce up to boil to thicken it and reduce it and then I whisked in a tablespoon of room temperature.

I killed the heat and put the chicken breasts (and any collected juices) back into the pan, turning them to coat them with the piccata–style sauce. I put the chicken on a plate with the potatoes and the salad and then drizzled a bit of sauce over the top of the chicken.

Viola! Lunch is served!


Baby Heirloom Tomato Salad with Bocconcini & Avocado

Very pretty and pretty damn tasty salad.

Over the weekend I picked up this assortment of stunning baby heirloom tomatoes. It was a gorgeous mixture of little reds and greens and yellows and oranges — all pretty and all delicious. I whipped up a salad of these tomatoes, which I halved and tossed with bocconcini (little balls of fresh mozzarella), shaved celery, red onion, and avocado. The dressing was a combination of white wine vinegar, dijon mustard, honey, fresh garlic, extra virgin olive oil, sea salt, and cracked pepper. For a little herbal kick I added some minced chives, parsley, cilantro, and fresh mint.

This is quite possibly the last week I can get great local tomatoes and I’ve been making the most of it, eating them every day. If you can still find some decent tomatoes in your area, I suggest you do the same. Right now.


Today’s Salad: Greens & Blues

20120923-131846.jpg

Today’s salad is a simple but very satisfying combination of crisp romaine lettuce, crunchy and peppery watercress, and a little bit of chopped scallion greens tossed with an Easy Blue Cheesy dressing. I’m actually going to give the full-fat recipe as well as tips for a reduced fat version. Both are tasty.

I love watercress and its spicy herbaceous bite. It works miracles with milder greens like iceberg, butter, and romaine lettuces, creating nice textural and flavor contrasts. And when you toss it with a creamy dressing like ranch or green goddess or blue cheese the pepperiness gets tempered by the fatty richness of the dressing, making for a sublime eating experience.

When I make a salad like this I like to take one bunch of watercress, cut off (and discard) the woody stems, and coarsely chop the cress into pieces between a half-inch and an inch in length. I soak the watercress briefly in water to refresh it and then spin it dry. It’ll produce about two cups of loosely packed watercress. To this I’ll add about four cups of loosely packed chopped and cleaned and dried romaine and throw in about a third of a cup of coarsely chopped scallions.

When I toss the greens with a creamy dressing I use my (very clean) hands to gently cover the leaves evenly and lightly. Also I try to make very robust, flavorful dressings so that I can use comparatively less of it, which is something to keep in mind if you’re trying to eat cleaner and lighter. Yes, yes I recognize that this is a fatty, creamy dressing and it’s never going to be the healthy choice that say, oil and vinegar, is. But there’s no reason for a salad to be gut-bomb, is there?

A few notes: For this dressing I like to use a relatively mild blue cheese, a domestic like Maytag or Pt. Reyes or a Danish blue. Salt content varies wildly in blue cheeses, so you’ll have to trust your own palate for salt quantities. Keep in mind that refrigerated dressings will taste less salty than when at room temperature, so you may need to adjust your seasoning after you’ve chilled it and before you dress your salad. Keep in mind too that the full-fat version of this dressing will stiffen as it chills, which means you might want to whisk in a little water to adjust the consistency of your dressing prior to making your salad.

This dressing makes a killer dip for Buffalo chicken wings, btw.

Easy Blue Cheesy Dressing

• 1/2 cup blue cheese crumbles, plus a little more (see bottom of ingredient list)
• one small garlic clove, minced
• 1 teaspoon minced shallots
• 1/2 teaspoon dijon mustard
• 1/2 teaspoon cider vinegar
• 1/2 cup sour cream
• 1/4 cup mayonnaise
• 1 tablespoon olive oil
• 1 tablespoon water
• pinch sugar
• lots of cracked black pepper (kind of a coarse grind)
• kosher salt to taste]
• about one heaping tablespoon of fine blue cheese crumbles (for texture!)

Put all the ingredients (except extra cheese) into a blender and blend until smooth. Transfer to a bowl and stir in the extra blue cheese. Refrigerate until ready for dinner.

Easy Blue Cheesy Dressing (Slight Return)

To make a reduced fat version of this dressing take out the sour cream and use fat-free Greek-style yogurt instead. Also, take out the mayo and use reduced fat Vegenaise instead.

20120923-131916.jpg